2024-01-03 74th Class
Transfer Learning
#️⃣ 전이학습 이란?
이미 한 태스크에서 학습된 모델을 다른 관련된 태스크에 적용하여 학습 효율을 높이는 기법
Pre-training: 모델이 대규모 데이터셋을 사용하여 학습하는 단계. 일반적인 특징이나 패턴 학습
Fine-tuning: 사전 학습된 모델을 새로운 태스크에 적용하고, 해당 태스크의 데이터 셋을 사용하여 추가 학습을 하는 단계. 이때 모델의 일부 또는 전체를 새로운 데이터에 맞게 조정
전이학습 종류

Strategy 1: 모델의 구조만 활용, 가중치 재학습
Strategy 2: 일부 레이어만 활용, fc 학습
Stragety 3: 모델 가중치 고정, fc 학습
Pytorch Transfer Learning
#️⃣ MNIST Transfer Learning
Full Code
import torch
import torchvision.transforms as transforms
from torchvision import models, datasets
from torch import nn, optim
from torch.utils.data import DataLoader, Subset
from sklearn.model_selection import train_test_split
from tqdm import tqdm
import matplotlib.pyplot as plt


DEVICE = torch.device("cuda" if torch.cuda.is_available() else "cpu")
print(f"{DEVICE=}")

# 1. Model
model = models.resnet50(weights=models.ResNet50_Weights.DEFAULT)
# all_models = models.list_models()

# 전체 layer를 frozen하기
for param in model.parameters():
    param.requires_grad = False

# 마지막 fc layer만 재학습하는 것으로 수정
for param in model.fc.parameters():
    param.requires_grad = True

# fc 수정
model.fc = (
    nn.Sequential(
        nn.Linear(model.fc.in_features, 10),
        nn.LogSoftmax(dim=1)
    )
)

model.to(DEVICE)

print(model)

# 2. Dataset
# 이미지
transformtransform = transforms.Compose([
    # 흑백이미지를 컬러로 바꾸기 (1-ch to 3-ch)
    transforms.Grayscale(num_output_channels=3),
    transforms.Resize((224, 224)),
    transforms.ToTensor()
])

train_dataset = datasets.MNIST(root='dataset', train=True, download=True, transform=transform)
test_dataset = datasets.MNIST(root='dataset', train=False, download=True, transform=transform)

# train dataset에서 val 0.2 분리
train_idx, val_idx = train_test_split(range(len(train_dataset)),
                                      stratify=train_dataset.targets,
                                      test_size=0.2)

train_dataset = Subset(train_dataset, train_idx)
validation_dataset = Subset(train_dataset, val_idx)
# train 48000 validation 12000 test 10000

# DataLoader
BATCH_SIZE = 128
LR = 0.001
EPOCHS = 5
N_SAMPLES = len(train_dataset)
N_TEST = len(test_dataset)
train_dataloader = DataLoader(train_dataset, batch_size=BATCH_SIZE, shuffle=True)
val_dataloader = DataLoader(validation_dataset, batch_size=BATCH_SIZE, shuffle=True)
test_dataloader = DataLoader(test_dataset, batch_size=BATCH_SIZE, shuffle=False)

optimizer = optim.Adam(model.parameters(), lr=LR)
# 다중분류에 NLL Loss 사용
criterion = nn.NLLLoss()

# Train
for epoch in range(EPOCHS):
    model.train()
    epoch_loss, n_corrects = 0., 0

    for X, y in tqdm(train_dataloader):
        X, y = X.to(DEVICE), y.to(DEVICE)

        pred = model(X)
        loss = criterion(pred, y)

        optimizer.zero_grad()
        loss.backward()
        optimizer.step()

        epoch_loss += loss.item() * len(X)
        pred_cls = torch.argmax(pred, dim=1)
        n_corrects += (pred_cls == y).sum().item()

    epoch_loss /= N_SAMPLES
    epoch_accr = n_corrects / N_SAMPLES

    print(f"Epoch {epoch+1}/{EPOCHS}, Loss: {epoch_loss}, Accuracy: {epoch_accr}")
    # model save
    torch.save(model, f'resnet50_e0{epoch+1}.pt')


# model save
torch.save(model, 'resnet50_.pt')

# model load
model = torch.load('resnet50_.pt')
model = model.to(DEVICE)

# evaluation
with torch.no_grad():
    total_loss, n_corrects, = 0., 0
    wrong_input, wrong_preds_idx, actual_preds_idx = list(), list(), list()

    model.eval()
    for X_, y_ in tqdm(test_dataloader):
        X_, y_ = X_.to(DEVICE), y_.to(DEVICE)

        pred = model(X_)
        total_loss += criterion(pred, y_)
        pred_cls = torch.argmax(pred, dim=1)
        n_corrects += (pred_cls == y_).sum().item()

        wrong_idx = pred_cls.ne(y_).nonzero()[:, 0].cpu().numpy().tolist()
        for index in wrong_idx:
            wrong_input.append(X_[index].cpu())  # 잘못 예측한 X 값
            wrong_preds_idx.append(pred_cls[index].cpu())  # 잘못 예측한  Y값
            actual_preds_idx.append(y_[index].cpu())  # 실제 Y값


total_loss /= N_TEST
total_accr = n_corrects / N_TEST


# visualization

fig, axes = plt.subplots(nrows=2, ncols=5, figsize=(20, 10))
axes = axes.flatten()

for idx, ax in enumerate(axes):
    ax.axis('off')
    ax.imshow(wrong_input[idx][0, :, :].numpy(), cmap='gray')
    ax.set_title(f"pred: {str(wrong_preds_idx[idx].item())}, actual: {str(actual_preds_idx[idx].item())}")

plt.tight_layout()
plt.savefig('wrong_nums.jpg')
plt.show()
틀린 숫자만 보기
#️⃣ CIFAR10 Transfer Learning
Full Code
import torch
import torchvision.transforms as transforms
from torchvision import models, datasets
from torch import nn, optim
from torch.utils.data import DataLoader, Subset
from sklearn.model_selection import train_test_split
from tqdm import tqdm
import matplotlib.pyplot as plt

DEVICE = torch.device("cuda" if torch.cuda.is_available() else "cpu")
print(f"{DEVICE=}")

# 1. Model
model = models.resnet34(weights=models.ResNet34_Weights.DEFAULT)
for param in model.parameters():
    param.requires_grad = False

for param in model.fc.parameters():
    param.requires_grad = True

# Softmax는 criterion에서 계산
model.fc = nn.Linear(model.fc.in_features, out_features=10)
model.to(DEVICE)


# 2. Dataset
# 이미지를 텐서(Tensor)로 변환
transform = transforms.Compose([
    transforms.ToTensor(),
    transforms.Normalize((0.5, 0.5, 0.5), (0.5, 0.5, 0.5))
])

# 훈련용 데이터셋
train_dataset = datasets.CIFAR10(root='./data', train=True,
                                 download=True, transform=transform)

# 테스트용 데이터셋
test_dataset = datasets.CIFAR10(root='./data', train=False,
                                download=True, transform=transform)

# 클래스 레이블
classes = ('plane', 'car', 'bird', 'cat', 'deer', 'dog', 'frog', 'horse', 'ship', 'truck')

# Dataloader
BATCH_SIZE = 128
LR = 0.001
EPOCHS = 5
N_SAMPLES, N_TEST = len(train_dataset), len(test_dataset)
train_dataloader = DataLoader(train_dataset, batch_size=BATCH_SIZE, shuffle=True)
test_dataloader = DataLoader(test_dataset, batch_size=BATCH_SIZE, shuffle=False)

optimizer = optim.Adam(model.parameters(), lr=LR)
# nn.CrossEntropyLoss는 내부에서 Log Softmax를 수행하고 nll_loss를 계산함
criterion = nn.CrossEntropyLoss()

# 3. Train
for epoch in range(EPOCHS):
    model.train()
    epoch_loss, n_corrects = 0., 0

    for X, y in tqdm(train_dataloader):
        X, y = X.to(DEVICE), y.to(DEVICE)

        pred = model(X)
        loss = criterion(pred, y)

        optimizer.zero_grad()
        loss.backward()
        optimizer.step()

        epoch_loss += loss.item() * len(X)
        pred_cls = torch.argmax(pred, dim=1)
        n_corrects += (pred_cls == y).sum().item()

    epoch_loss /= N_SAMPLES
    epoch_accr = n_corrects / N_SAMPLES

    print(f"Epoch {epoch + 1}/{EPOCHS}, Loss: {epoch_loss}, Accuracy: {epoch_accr}")
    # model save
    torch.save(model, f'resnet32_e0{epoch + 1}.pt')


# model save
torch.save(model, 'resnet32_.pt')

# model load
model = torch.load('resnet32_.pt')
model = model.to(DEVICE)

# evaluation
with torch.no_grad():
    total_loss, n_corrects, = 0., 0
    wrong_input, wrong_preds_idx, actual_preds_idx = list(), list(), list()

    model.eval()
    for X_, y_ in tqdm(test_dataloader):
        X_, y_ = X_.to(DEVICE), y_.to(DEVICE)

        pred = model(X_)
        total_loss += criterion(pred, y_)
        pred_cls = torch.argmax(pred, dim=1)
        n_corrects += (pred_cls == y_).sum().item()

        wrong_idx = pred_cls.ne(y_).nonzero()[:, 0].cpu().numpy().tolist()
        for index in wrong_idx:
            wrong_input.append(X_[index].cpu())  # 잘못 예측한 X 값
            wrong_preds_idx.append(pred_cls[index].cpu())  # 잘못 예측한  Y값
            actual_preds_idx.append(y_[index].cpu())  # 실제 Y값

total_loss /= N_TEST
total_accr = n_corrects / N_TEST


# visualization

fig, axes = plt.subplots(nrows=2, ncols=5, figsize=(10, 5))
axes = axes.flatten()

for idx, ax in enumerate(axes):
    ax.axis('off')
    ax.imshow(wrong_input[idx][0, :, :].numpy(), cmap='gray')
    pred_ = classes[wrong_preds_idx[idx].item()]
    actual_ = classes[actual_preds_idx[idx].item()]
    ax.set_title(f"pred: {str(pred_)}, actual: {str(actual_)}", fontsize=9)


plt.savefig('wrong_images.jpg')
plt.show()
print('here')
DEVICE=device(type='cuda')
Downloading: "https://download.pytorch.org/models/resnet34-b627a593.pth" to C:\Users\SBA_USER/.cache\torch\hub\checkpoints\resnet34-b627a593.pth
100%|██████████| 83.3M/83.3M [00:01<00:00, 65.1MB/s]
Downloading https://www.cs.toronto.edu/~kriz/cifar-10-python.tar.gz to ./data\cifar-10-python.tar.gz
100%|██████████| 170498071/170498071 [00:12<00:00, 13584004.63it/s]
Extracting ./data\cifar-10-python.tar.gz to ./data
Files already downloaded and verified
100%|██████████| 391/391 [00:13<00:00, 29.03it/s]
Epoch 1/5, Loss: 1.716059178504944, Accuracy: 0.40568
100%|██████████| 391/391 [00:10<00:00, 37.63it/s]
Epoch 2/5, Loss: 1.546443278503418, Accuracy: 0.46982
100%|██████████| 391/391 [00:10<00:00, 37.31it/s]
Epoch 3/5, Loss: 1.5057071448135375, Accuracy: 0.48526
100%|██████████| 391/391 [00:10<00:00, 37.64it/s]
Epoch 4/5, Loss: 1.4891329821395873, Accuracy: 0.48788
100%|██████████| 391/391 [00:10<00:00, 37.52it/s]
Epoch 5/5, Loss: 1.4838959331893922, Accuracy: 0.49252
100%|██████████| 79/79 [00:02<00:00, 30.01it/s]
틀린 그림만 보기
순환 신경망 (RNN, Recurrent Neural Network)
#️⃣ RNN이란?
자연어 처리, 음성 인식, 시계열 분석 등에서 널리 사용되는 인공 신경망의 한 종류
RNN의 핵심 특징은 시퀀스 데이터를 처리할 수 있는 능력
시퀀스 데이터는 순서가 중요한 데이터로 (ex: 문장, 시계열 데이터, 음악 등)
#️⃣ 데이터의 종류
-
순차적 데이터 (Sequential Data)
순차적 데이터는 어떤 순서로 나오느냐에 따라 단위의 의미가 달라지는 데이터를
ex) 자연어 문장이나 음성 신호, 주식 가격
이러한 데이터는 시간적인 의존성이 존재하며, 이전의 상태나 정보를 바탕으로 다음 상태나 정보를 예측하거나 분석하는데 사용 -
비순차적 데이터 (Non-sequential Data)
비순차적 데이터는 순차적인 순서나 의존성이 없는 데이터를
이러한 데이터는 개별적인 단위로 이루어져 있으며, 각 단위는 독립적으로 해석될 수 있음
ex) 이미지, 각각의 사용자에 대한 정보 등
이러한 데이터는 각 단위가 개별적으로 처리되며, 이전이나 다음 단위와의 상호작용 불필요
#️⃣ RNN 구조
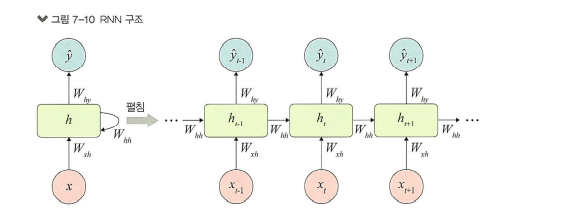
Feed-Forward Neural Network: Input layer → Hidden layer → Output layer로 단방향
RNN: 순환구조를 가지고 있어, 이전의 정보를 내부 상태로 저장하며 다음 단계의 입력에 활용. 시간 의존성 학습 가능

| 시점 | 입력 | 출력 |
|---|---|---|
| t-1 시점 | x(t-1), h(t) | o(t-1) |
| t 시점 | x(t), h(t-1) | o(t) |
| t+1 시점 | x(t+1), h(t) | o(t+1) |
W(x) : x를 h로 변환하기 위한 가중치
W(h) : RNN의 은닉층의 출력을 다음 h로 변환하기 위한 가중치
b: 편향(bias)
#️⃣ RNN 형태
- one-to-many : 1개의 벡터를 받아 Sequential한 벡터를 반환. 이미지를 입력받아 이를 설명하는 문장을 만들어내는 이미지 캡셔닝(Image captioning)에 사용
- many-to-one : Sequential 벡터를 받아 1개의 벡터를 반환. 문장이 긍정인지 부정인지를 판단하는 감성 분석(Sentiment analysis)에 사용.
- many-to-many(1) : Sequential 벡터를 모두 입력받은 뒤 Sequential 벡터를 출력. 시퀀스-투-시퀀스(Sequence-to-Sequence, Seq2Seq) 구조. 번역할 문장을 입력받아 번역된 문장을 내놓는 기계 번역(Machine translation)에 사용
- many-to-many(2) : Sequential 벡터를 입력받는 즉시 Sequential 벡터를 출력. 비디오를 프레임별로 분류(Video classification per frame)하는 곳에 사용
#️⃣ RNN의 단점
병렬화(parallelization) 불가능
벡터가 순차적으로 입력 -> sequential 데이터 처리를 가능하게 해주는 요인이지만, 이러한 구조는 GPU 연산의 장점인 병렬화를 불가능하게 만듦
기울기 폭발(Exploding Gradient)과 기울기 소실(Vanishing Gradient)
단순 RNN의 문제점은 역전파 과정에서 발생
역전파 과정에서 RNN의 활성화 함수인 tanh 의 미분값을 전달
위 그래프에서 최댓값이 1이고, (-4,4) 이외의 범위에서는 거의 0에 가까운 값을 나타냄
문제는 역전파 과정에서 이 값을 반복해서 곱해주어야 함
Recurrent가 10회, 100회 반복된다고 보면, 이 값의 10제곱, 100제곱이 식 내부로 들어가게 됨
만약 전달되는 값이 0.9 일 때 10제곱이 된다면 0.349가 되고, 시퀀스 앞쪽에 있는 hidden-state 벡터에는 역전파 정보가 거의 전달되지 않게 됨
= 기울기 소실(Vanishing Gradient)
반대로 이 값이 1.1 이면 10제곱만해도 2.59배로 커지게 됨.
->시퀀스 앞쪽에 있는 hidden-state 벡터에는 역전파 정보가 과하게 전달
= 기울기 폭발(Exploding Gradient)
기울기 정보의 크기가 문제라면, “기울기 정보의 크기를 적절하게 조정하여 줄 수 있다면 문제를 해결할 수 있지 않을까?”
이런 아이디어에서 시작하여 고안된 것이 바로 장단기 기억망(Long-Short Term Memory, LSTM)
LSTM
#️⃣ LSTM이란 ?
RNN에 기울기 정보 크기를 조절하기 위한 Gate를 추가한 모델

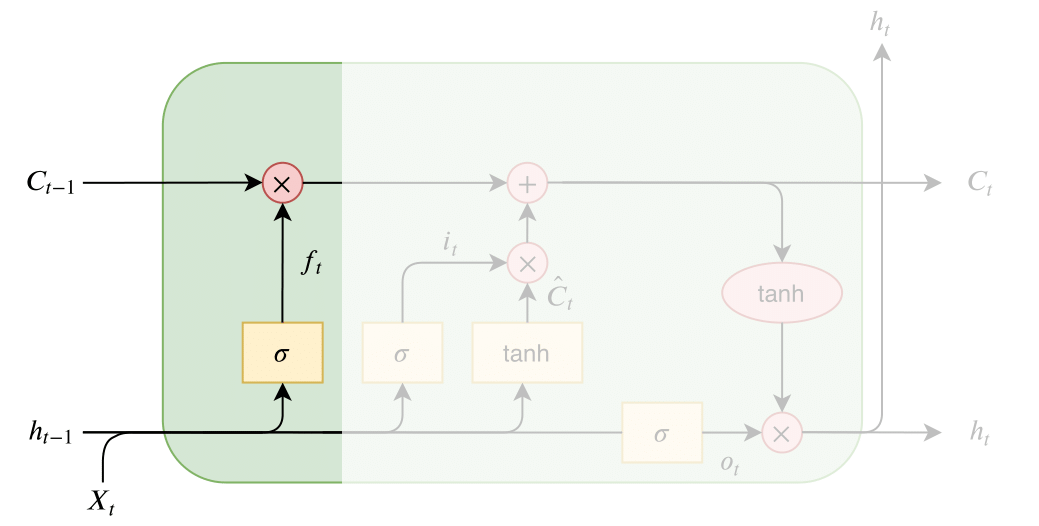
[1] forget gate
과거 정보를 얼마나 유지할 것인가? (output : 0~1)


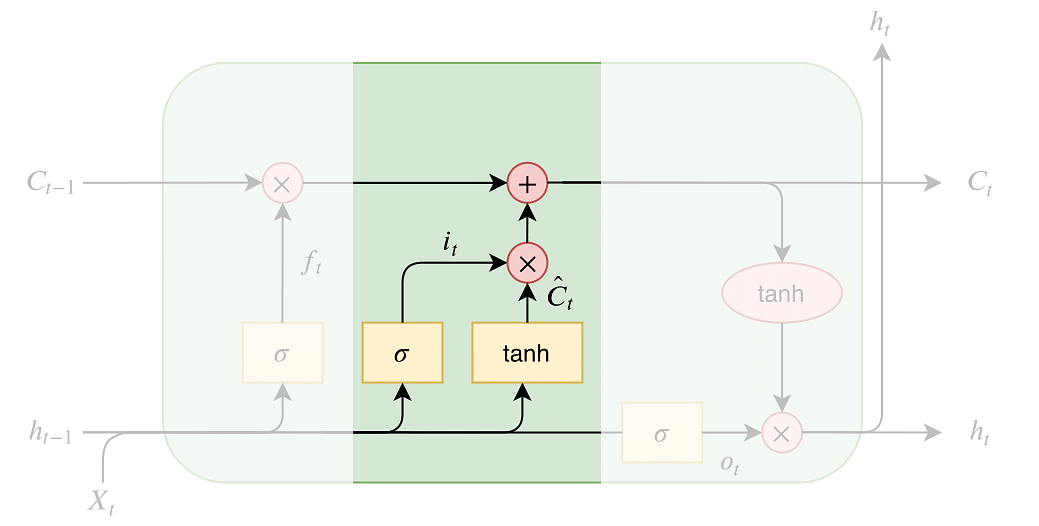
[2] input gate
이전의 Hidden state의 data와 새롭게 입력 된 input data를 더해 Cell State에 어떤 새로운 정보를 저장할지 정함


i(t) : 현재 시점에 데이터 중에 업데이트가 필요한 데이터를 판단
C(t) : Cell State에 추가할 새로운 후보값
[3] Update Cell State
Forget Gate에서 잃어 버리기로 한 정보 + Input Gate에서 새롭게 추가하기로 한 정보를 Cell State에 업데이트
hidden-state[h(t)] 말고도 활성화 함수를 직접 거치지 않는 상태인 cell-state[c(t)] 가 추가
cell-state는 역전파 과정에서 활성화 함수를 거치지 않아 정보 손실이 없기 때문에 뒷쪽 시퀀스의 정보에 비중을 결정할 수 있으면서
동시에 앞쪽 시퀀스의 정보를 완전히 잃지 않을 수 있음
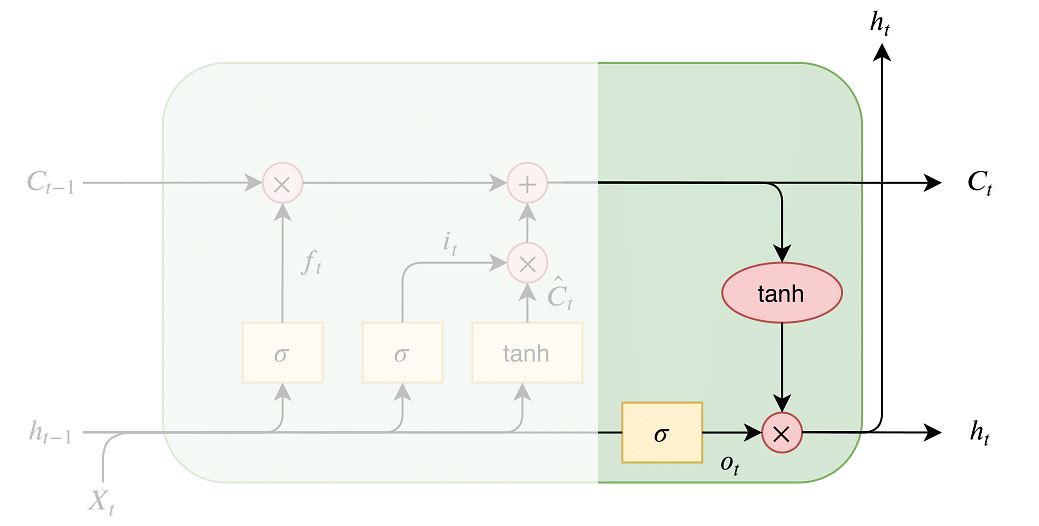
[4] Output Gate

GRU (Gated Recurrent Unit)

#️⃣ GRU 셀의 특징
- LSTM에서 있었던 cell-state가 없음. cell-state 벡터 c(t)와 hidden-state 벡터 h(t)가 하나의 벡터 h(t)로 통일.
- 하나의 Gate z(t)가 forget, input gate를 모두 제어. z(t)가 1이면 forget 게이트가 열리고, input 게이트가 닫히게 되는 것과 같은 효과. 반대로 z(t)가 0이면 input 게이트만 열리는 것과 같은 효과.
- GRU 셀에서는 output 게이트가 없음. 대신에 전체 상태 벡터 h(t)가 각 time-step에서 출력되며, 이전 상태의 h(t-1) 의 어느 부분이 출력될 지 새롭게 제어하는 Gate인 r(t)가 추가
Bidirectional RNN

미래의 정보도 현재의 상태를 이해하는 데 중요
양방향 RNN은 이 문제를 해결하기 위해 두 개의 별도의 순환 레이어를 사용. 하나는 시퀀스를 정방향(과거에서 미래로)으로 처리하고, 다른 하나는 역방향(미래에서 과거로)으로 처리
각 방향의 출력은 보통 연결되거나 합쳐져서 최종 출력을 생성 => 모델이 시퀀스의 양쪽 방향에서 정보를 동시에 고려 가능
양방향 RNN은 자연어 처리(NLP), 음성 인식, 시계열 예측 등 다양한 분야에서 사용
RNN의 단점인 경사 소실 문제(gradient vanishing problem)도 여전히 가지고 있어 장기 의존성(long-term dependencies)을 학습하는 데 한계
'Education > 새싹 TIL' 카테고리의 다른 글
| 새싹 AI데이터엔지니어 핀테커스 16주차 (금) - NLP & Tokenizer & Regex (2) | 2024.01.05 |
|---|---|
| 새싹 AI데이터엔지니어 핀테커스 16주차 (목) - LSTM Pytorch (1) | 2024.01.04 |
| 새싹 AI데이터엔지니어 핀테커스 16주차 (화) - Object Detection (1) | 2024.01.02 |
| 새싹 AI데이터엔지니어 핀테커스 15주차 (금) - PJT 10 Presentation (1) | 2024.01.02 |
| 새싹 AI데이터엔지니어 핀테커스 15주차 (목) - PJT 9 Presentation (0) | 2024.01.02 |